|
Glow Effect
1, In order to add a little flair to the glow, you should prepare the
background if possible. To do this, I used filter|render|lighting effects with a single omni light
in the middle. This will darken the edges.

2, Render your text or your graphic in a new layer above the background. Choose
a nice contrasting color for your graphic to enhance the
glow. I used the same color as the background. this will change later.

3, Now add a new layer between the background and the graphic layer. Ctrl-click
the graphic layer to load the text or design as a selection. Now go to select|feather, I used a radius of
10, but this depends on the size of the graphic. Normally it will be much more. Dont worry if the edges
aren't visible. Now select a color for your foreground. I used red. Press alt+backspace to fill the feathered
area. Do this a number of times. I did it 4 times.

4, Now add a new layer above this one and repeat the steps. This time feather
the selections less, only fill it a few times, and use a contrasting color. I feathered
the selection 5, use a yellow color and filled it twice.
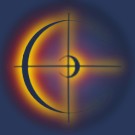
5, One last time, add a new layer, select your graphic. This time I feathered
the selection only 2, and filled it once with white. Now
we could leave it like this and it looks okay. There are
a couple of things you can do to make the effect stronger though.

6, If you just de-activate the graphic layer it gives an interesting 'hot' looking
effect as such.

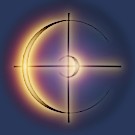
7, To achieve this look, change the blending mode of all the layers to screen,
change the blending mode of the layer with the text or graphic on it to color burn. Then use
filter|blur|gaussian blur with a small radius to smooth it out a bit.
|