Brushes Palette: Shape Dynamics (Part 3 of 5)
Photoshop 7's new Brushes
palette is far more than simply a place to pick a brush. You
have incredible control over the size, shape, and behavior
of the brush. In this column, we'll look at the Shape
Dynamics and the Scatter panes of the Brushes palette.
SHAPE DYNAMICS
The Shape Dynamics pane of the Brushes palette controls
three aspects of the stroke appearance: size, rotation, and
perspective. The variations for each parameter are specified
with sliders.

The Shape Dynamics settings are:
� Size Jitter - This slider determines how much variation
there will be in the individual instances of the brush's
tip. At the maximum of 100% variation, instances of the
brush tip can be as small as 10% (or smaller) of the
diameter that you have set. In no case will Size Jitter
create instances of the brush tip larger than the Diameter
selected in Brush Tip Shape or the Master Diameter selected
in Brush Presets.
� Minimum Diameter - You can constrain the
size of the smallest instances using the Minimum Diameter
slider.
� Tilt Scale - When the Control pop-up menu
is set to Tilt, this slider regulates how much the angle of
the stylus will affect the brush stroke.
� Angle Jitter - With non-round brush tips,
the angle of application can be varied. The Angle Jitter
setting determines the degree of variation. At a setting of
25%, the orientation of the brush tip with vary from -90
degrees to +90 degrees Remember that, by default, the angle
is relative to orientation of the page rather than the path
of the stroke - even if you drag a circular stroke, the
variation in angle remains relative to the top of the image.
Orient the brush tip to the path by changing the Control
menu under Angle Jitter to Direction. (You don't need to
change the Angle Jitter from 0%.)
� Roundness Jitter - The Roundness slider
controls variation in the proportion of a brush tip. When
set to 0%, each instance of the brush has the same
width-to-height relationship. As you increase Roundness
Jitter, you add variation. At 100% jitter, the height of the
brush instances will vary between approximately 5% and 100%
of the size specified in the Brushes palette. Roundness
never increases the height beyond that selected with the
Diameter or Master Diameter sliders.
� Minimum Roundness - You can constrain the
Roundness variations using this slider. It sets the smallest
instance that the brush will produce when Roundness Jitter
is activated.
Examples of the shape dynamics are shown
here. For ease of identification, custom brushes were
defined using numerals. In all cases, Spacing was set to
110%.
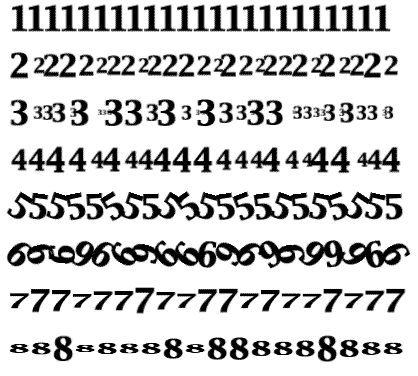
� Number 1: The stroke has no shape dynamics
applied.
� Number 2: Size Jitter is 50%.
� Number 3: Size Jitter is 100%.
� Number 4: Size Jitter is 100% combined
with a minimum diameter of 50%.
� Number 5: Angle Jitter is set to 10%.
� Number 6: Angle Jitter is 50%.
� Number 7: Roundness Jitter is 50%.
� Number 8: Roundness Jitter is set to 100%,
with a Minimum Roundness of 20%.
Note the difference between Roundness and
Size jittering. With Roundness, the width of each brush
instance remains the same - only the height is varied. When
working with the dynamic brush options, think of the slider
as representing the amount of variation or variety or change
in the individual brush instances along the stroke, and the
pop-up menu as the control for that variation. Combining
Shape Dynamics settings produces more complicated patterns.
However, once you understand what each option does, their
interaction is more predictable. This stroke was created
with the settings shown.
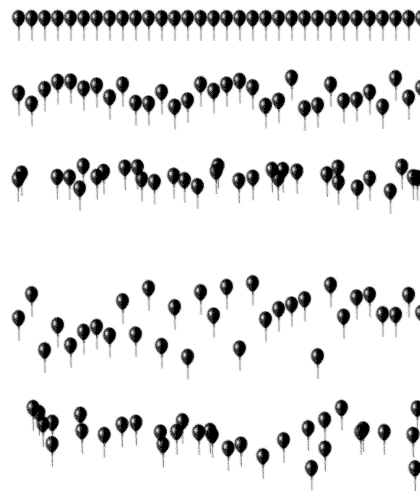
SCATTERING
Scattering spreads copies of the brush tip as instances
along the path of the stroke. The next image illustrates how
Spacing affects Scattering and shows the influence of the
Count and Count Jitter options.

In this image, the following settings are
used:
1. Spacing 25%, Scatter 220%, Count 0, Count Jitter 0%.
2. Spacing 100%, Scatter 220%, Count 0,
Count Jitter 0%.
3. Spacing 100%, Scatter 220%, Count 3,
Count Jitter 0%.
4. Spacing 100%, Scatter 220%, Count 3,
Count Jitter 60%.
Using Spacing to create a specific density
of brush instances results in substantial overlap in places,
as well as some areas of "clumping," where many instances
occur in a small space. Using the Scattering and Count
options, especially in conjunction with Count Jitter,
produces the appearance of random distribution, while doing
a better job of preserving individual brush instances.
The Scattering pane of the Brushes palette
also offers the check box Both Axes. In the first set of
examples, only one axis is used for distributing the brush
instances. The scattering is perpendicular to the path.
Adding the second axis enables you to randomize the
scattering along the path as well.
These five examples, all set to Spacing
100%, do not use the Count option in order to better display
the effect of adding a second axis of distribution. The
settings used in image are:
1. No scattering.
2. Scatter 100%, one axis.
3. Scatter 100%, both axes.
4. Scatter 250%, one axis.
5. Scatter 250%, both axes.
Enabling the Both Axes option produces a
result much like using a reduced Spacing setting - some
clumping of the brush instances occurs as the distribution
is varied along the path of the stroke.
TIP: When Count and Count Jitter are used
and Scatter is set to Both Axes, a very random pattern can
be produced, but you're likely to see brush instances
bunched together in groups. Add some Roundness Jitter (Shape
Dynamics) to produce an illusion of depth.
|