Brushes Palette: Tip Shapes (Part 4 of 5)
Photoshop 7's new Brushes
palette is far more than simply a place to pick a brush. You
have incredible control over the size, shape, and \behavior
of the brush. The Brush Tip Shape pane of the Brushes
palette is one of the keys.
The Brush Tip Shape pane includes thumbnails
of the brushes currently loaded in the palette. Click on a
thumbnail to select the brush. You can then modify the
diameter, angle, roundness, hardness, and spacing values
using sliders.
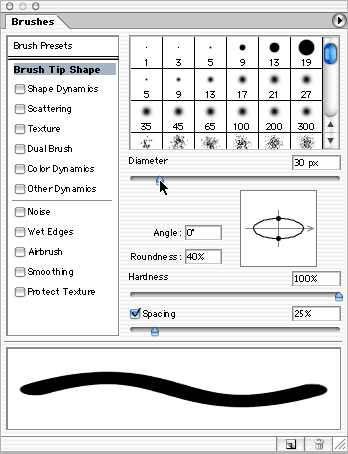
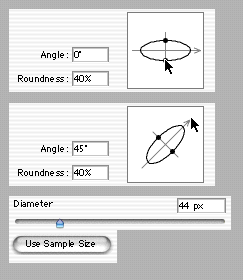
You can also modify the roundness (top) and
angle (middle) by dragging in the preview. The Hardness
slider determines feathering for the brush tip. It is only
available for round brushes. When a custom or square brush
is selected, the Use Sample Size button is visible. When not
grayed out, you can click it to reset the brush to the size
at which it was designed.
When experimenting with the various brush
capabilities, it's easiest to see what each does when you
disable all others. For example, when determining optimal
spacing for a brush tip, uncheck the dynamics options in the
Brushes palette.
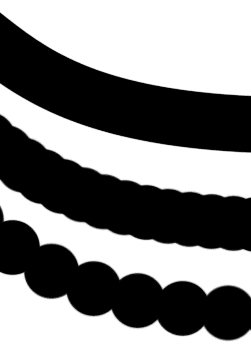
The Spacing variable determines the distance
between instances of the brush tip. Rather than a continuous
flow of ink from a pen, think of Photoshop's brushes as a
series of imprints of the brush tip. When the brush tip
instances are very closely spaced, they overlap and you see
what appears to be a continuous line of color. When spacing
is increased, the you see the individual instances. (From
the top, three identical paths are stroked with a 55-pixel
hard round brush with spacing of 1%, 40%, and 83%.)
When the Spacing option is turned off in the
Brush Tip Shape pane of the Brushes palette, the spacing is
governed by the speed of your drag. the faster you drag, the
greater the spacing. (As indicated, the mouse was dragged at
increasing speed through the curves.)

CONTROLLING THE DYNAMIC OPTIONS
Before discussing the additional Brushes palette options, an
explanation of the Control pop-up menus is appropriate. Many
of the options explained in the following sections are
"dynamic" options - they produce variations in the brush as
the brush is used. The variety of brush instances adds a
randomness to the stroke that would be time-consuming to
create manually. You can use the Fade option to taper-off
the effect on the brush. Photoshop 7 enables you to exercise
even more control over the "randomness" of the variations
when you use a drawing tablet.
OFF
When Control is set to Off, Photoshop applies the selected
jitter randomly and throughout the length of the brush
stroke. The stroke is unregulated.
FADE
Fade is available with or without a pressure-sensitive
tablet. When Fade is selected, the field immediately to the
right of the Control menu is active. You specify a value
between 1 and 9999. If you set a jitter slider to 0% and
specify a value, the Fade command specifies either the value
to which the stroke fades or when the specific jitter ends
along the stroke.
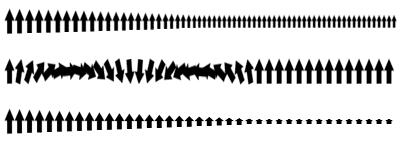
All three examples use the same brush and
Fade set to 25. Only one jitter option is active for each
sample. The only difference among the three strokes shown is
the one jitter setting. The brush uses the same tip and a
Spacing of 100% to best illustrate the differences among the
effects of the Fade setting.
� The top sample shows Size Jitter set to
25%, with a minimum diameter of 50%. Note that the fade
option forces the brush tip size to the 50% diameter after
25 instances of the brush.
� The middle sample shows a stroke with the
Angle Jitter set to 0% and Control set to Fade, 25. The
brush tip "angles" 360 degrees over the first 25 instances.
After completing the selected jitter, the stroke returns to
its original appearance for the 26th instance and beyond.
� The bottom stroke has Roundness Jitter set
to 0%, Fade at 25 as the Control, and a Minimum Roundness
setting of 20%. Like the top example, the stroke reaches the
desired Roundness (20%) after 25 instances.
For the first and third examples, the Fade
field's value represents the number of instances the stroke
uses to reach the value specified for the jitter. In the
middle example, the stroke uses the number entered in the
Fade field as the extent or duration of the jitter.
PEN PRESSURE
The Pen Pressure option is used with a pressure-sensitive
tablet, such as those from Wacom. Increasing the pressure of
the stylus on the tablet decreases the amount of jitter -
the greater the push of the pen, the less the variation of
the stroke. This image shows examples of Size, Angle, and
Roundness Jitter with Pen Pressure activated. (In all three
examples, the pen pressure is light on the ends and heavy in
the middle.)

PEN TILT
Pen Tilt reads the angle of the stylus on the tablet rather
than the pressure to adjust the jitter. It is especially
useful for airbrush artists using the Brush tool with the
Airbrush option.
STYLUS WHEEL
Some tablet accessories, such as Wacom's Intuous and
Intuous2 Airbrushes, include a fingerwheel. When available,
the wheel can be used to regulate the amount of variation
with Stylus Wheel selected in the Control pop-up menu.
INITIAL DIRECTION
Available for the Angle Jitter option only, the Initial
Direction option determines the orientation of the brush
instances as you drag. In the next image, the settings are
identical for both samples. The Angle Jitter is set to 25%,
constraining the brush angles to -90 degrees to +90 degrees.
The top sample, created from left to right, varies the angle
in relation to the top of the page. The lower sample,
dragged from right to left, reverses the orientation.

The 25% setting for Angle Jitter restricts
the brush tip angle to one-quarter of a circle (90 degrees)
in either direction from the original brush orientation.
DIRECTION
Also available for the Angle Jitter option only, The
Direction control orients the brush tip to the path rather
than to the page. In these examples, the Angle Jitter is set
to 0% to best show the orientation of the brush to the
paths.

The initial direction of drag when using
Direction determines which way the brush tip instances will
be pointed. The two examples in to the right illustrate the
difference.
TIP: Using Angle Jitter 0% and Control:
Direction keeps the brush tip oriented to the path. This is
a great way to use custom brushes to draw dashed lines,
borders, dividing lines, even such things as railroad tracks
and roads.
|