Faking Images; Special Effects
So the head of marketing was so impressed with your ability
to get Dick Trickle to adorn his winning NASCAR with your
logo, he became your willing slave. Now that's all fine and
good, but everybody knows that the best way to make people
drool is with larger-than-life special effects. With
Photoshop as your tool, you too can create the kind of
images that'll make people scratch their heads and ask,
"How'd they do that?" All it takes is a little forethought.
As we learned with paths, cutting around an image is a fairly easy process
(as long as you're anal enough to do it right). For today's
lesson, the tool becomes secondary, the idea primary. Let's
say you want to make a Web page to show your friends back
East how much fun can be had out in the Wild West. Sure, you
could send them photos of the house in Pacifica slipping
into the ocean, or reports that The Big One's on its way.
But you want to have some fun (and show off too). It doesn't
take a big budget to do up some fine computer-generated
imagery - it just takes an idea, a digital camera, and
clever use of paths.
The major things to consider for a truly faked image are
lighting and shadowing. If either of those are off, even a
little, it will stick in people's minds, and they'll know
it's faked (even if they don't know they know).
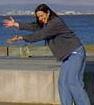
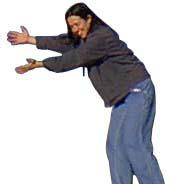
Say you want a picture of two of your friends
water-fighting across the Jeremiah O'Brian battleship by the
Bay Bridge. Simple enough (well, "simple" if you and your
two friends can get out of the office and down to the
Embarcadero). Plan the layout of the image in your head, and
grab the digital camera.
Shooting on Location
Now I'm not a big digital camera fan. The technology just
isn't there yet (shy of dropping a huge chunk of change on a
Canon attachment). But for outdoor pictures that you're
going to tweak, digital cameras fit the bill quite nicely.
If you don't have a digital camera, a regular camera will
work (but when you get the photos developed, make your life
easier and get them put on a disk). The reason you need your
friends to physically go down to the water is so you can
catch them in the same light as the scene you want to place
them in. This is the key. Your knowledge of paths will help
you get rid of the excess, but you need to get the
lighting effects right for something like this to be
convincing.

First, pick your scene - in our case, it's the boat. Best
to get a nice wide view of it, as we'll be dropping in two
people. Take a bunch of pictures to increase your chances of
getting exactly what you're looking for. Now, before the fog
rolls in or your friends head over to Red's Java House for Buds and sausage sandwiches, take a
picture of Friend One in a "ducking away from a splash of
water" pose, using the angle of light that you envision for
the final product. Then take a picture of Friend Two in a
"splashing water" pose, again using the appropriate lighting
angle. Finally, snap a pic of splashing water and make sure
you get it coming from the direction that you "see" in your
mind's eye (or, if your friends aren't interested in
"getting their feet wet," using stock photography will work
fine). Now it's all up to you (and Photoshop) to put
together the final image.

Drop Your Friends into the Bay
Either download your images from your camera or pull them
off the disk, then open them in Photoshop. Since you took
multiple photographs, choose the ones with the best and most
similar lighting. Yesterday I told you to work only with
images that you've finished sizing and scaling. But for
today's task, I want you to forget all that and resize your
images to about 1.5 times what you want for the final image,
since the work we're doing requires a bit more elbow room.
Now figure out where you want to place your friends. I'm
thinking one on the far side of the boat, one on the near
side. With that in mind, it's time to clear some paths
around your friends.
Unlike yesterday, when we wanted to leave stuff in
(tires, windshield, etc.), today we want to create paths
that cut away everything but the person. This means
cutting around their hair, which sucks, but just do it
loosely and we'll fix it with the eraser tool later. And
that, unfortunately, is the easy part. We have some tricky
preparation to deal with because we chose a somewhat
intricate environment to drop our friends into. Since Friend
Two will be "standing" behind a bunch of little turrets and
antennas, we also need to cut paths around all the areas
where Friend Two should be visible. The things we do to get
people to come West!

Now that you've done all your path work, it's time to set
everything into action. Let's start with our friends. For
each friend, make a copy of the main image layer. Put a
layer of white between the original and the copy. Make sure
you're working in the top layer (the copy), and select your
path(s) - you can select multiple paths the same way you can
select multiple areas, by holding down the Shift key. Now go
to Select->Inverse. This selects everything but your
paths. Hit Delete. This should allow you to see if you cut
your paths well enough. Are there any shadows of blue around
the edge of the face? Excess background near the fingers?
No? Great! If you find problems, no big deal. Just undo what
you just did (Control+Z on a PC, Apple+Z on a Mac), deselect
the area selected (Control/Apple+D), and go back and tighten
up the paths. Once everything's perfect, select the path and
then copy (Control/Apple+C) and paste (Control/Apple+V) it
into your scene (Photoshop 4 will automatically put it into
a new layer, but if you're using an older version, you need
to create an additional layer manually). Now go through the
same process with the other friend. And from here on out,
it's all about layers.

Layering the Layers
Now would be a good time to Save everything you've done
so far as a backup. OK, so you have an Original Scene layer,
a copy of that, a Friend One layer, and a Friend Two layer.
Now we need to re-order the layers so that everything is in
front or behind the right things. The whole scene should be
the bottom layer (so this layer should be listed last in
your layers window). Make the next layer the friend on the
far side of the boat. Next layer should be the copy of the
battleship, and on top goes the layer featuring the friend
on the near side of the boat. Making sure you're in the copy
layer (the one second from the "top"), select everything
above the boat, and all of the areas between the girders,
and hit Delete. (Since everything also exists in the bottom
layer, you'll still be able to see it all.) Now drop the
person on the far side of the boat right where you want
them. I know, I know, the person should be scaled down and
the legs need to be cropped off. No problem. Right now we're
just worried about position - we'll go back and clean things
up later.

Use the Move tool to position the layer with the person
in the foreground. (Again, we'll deal with the legs in a
minute.) Chances are what you've got so far looks pretty
good, but your image lacks depth - the person in the
background is behind the boat, the person in the foreground
is in front of the boat. But if they were really splashing
water, chances are you'd be able to see their arms waving
about. Which is totally doable. If you want the background
person's arms "over" the boat, copy that person's layer. (Do
you see the beauty of having divided the major elements of
your image into separate layers yet?) Use the Lasso tool to
select the part of the person's arm that you want over
versus under, then Select->Inverse, and hit Delete. Then
move this new layer on top of that person's original layer.

The final missing element - The Splash - can also be
added by using paths. Don't go crazy creating a path for
every droplet - cut loose paths around the entire splash and
we'll fix everything by using Opacity (so you can see
through the water) and blurring the edges. You'll probably
need to divide it into two layers - one between the top
layer and the background person's arm, and one behind the
boat - so that the water appears to be sailing over and
across the boat.
Now all that's left to do is add the shadows and
reflections, then blur and tweak everything, and you're
done.
Shadowing Your Friends
Since we took the pictures expressly to simulate the
proper lighting, we've done a lot of our shadow work
already. But if the person in the background has an arm
dangling over the boat, it should be casting a shadow,
right? Look at the angle of the rest of the shadows, and how
they're falling, and then use the Burn tool at, say, 26
percent (and select the second brush size in the second row
of the Brushes window), to create a shadow in the boat
layer. Don't overdo it - it's just a shadow, not some dark,
looming splotch. Now go ahead and add any other necessary
shadows (don't forget The Splash), making sure you
accurately imitate the nature of a shadow: Should it be
curving around the turrets on the boat? Rippling over the
water?
Now let's get rid of your friends' legs. Look at how the
water comes up around the edge of the boat. That's how we
want to treat the removal of the legs. Of course we could
have had your friends pose standing in water, but there's
friendship and there's pushing it. Use the Lasso tool,
setting the anti-aliasing to zero, to draw around and select
the areas you intend to get rid of. Now Select->Feather (set
to around three or four) and blur the edges of your
selection, then Delete. You may have to go back in with the
Erase tool (set at about 35 percent opacity, first brush
second row) and clean up a little.

Reflecting on Reflections
Reflections are what give your image its final caress of
credibility. Take a look at how the boat is reflected in the
Bay, and what kind of shadows it's making in the water. You
want to do the same exact thing with your friends. The idea
is to make it seamless, not, "Hey look! I can do
reflections!" Take a gander at how much reflection the boat
gives off, and then use the Lasso tool to select an
equivalent portion of the person. Copy and then put the
selection in a layer right above the boat layer, and flip it
horizontally (Layer->Transform->Flip Horizontal). Drop the
opacity down so you get the water coming through, and
Filter->Blur->Motion Blur at an angle of 90 degrees (at
around 8 to 10 pixels). Then, using the Eye Dropper tool,
select the color of the boat's shadow.
Now paint in the shadow using the Brush tool at the same
angle as the shadow of the boat (all in another
layer, which you should place above your reflection layer).
Then drop the opacity so it matches the boat's shadow, and
blur it at the correct angle (again, using
Filter->Blur->Motion Blur). You may need to use
Image->Adjust->Brightness/Contrast to darken it (since
dropping the opacity allows the water to show through but
also reduces the darkness).
Now clean up. Touch up the hair with the Erase tool so
that it doesn't have any sharp edges, and blur any sharp
edges on the clothing. I think that last item's one of the
biggest things that people overlook when Photoshopping -
they're so pleased with what they've done, they don't want
to hide their work by blurring it. But like I said, it's
about being seamless. The person in the background needs to
be blurred to match the other objects in the plane; shadows,
water, etc. need to be blurred accordingly. The more that
little things like these are addressed, the more "realistic"
the scene looks. Not that this scene is realistic in the
least (Kristin would much rather push Jim down a hill than
splash him with water). But making it look "correct," in
terms of depth and shadowing and reflections, makes it
impressive, not "Oh, cool, you have Photoshop too."
The thing to remember when doing this is layers, layers,
layers. I've been mocked on many occasions for the number of
layers I use, but they allow you to try stuff out without
destroying the clean version and they also let you go back
and change things quickly. Perhaps you remember the grim
days of layer-less Photoshop 2?
Finally, Save As a JPEG, slap it up on a page, and send
it to the East Coast posse that you're trying to lure out to
SF.

Homework? Fake your own scene.
|