Automating Tasks in Photoshop (Part 2 of 2)
Creating a More Complex Action
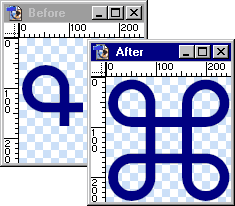
For this example, we will create an action that mirrors
the active layer across both the vertical and horizontal
axes (on a separate layer to ensure that the original layer
remains unaltered) and then centers the results on the
canvas. This can be useful for creating symmetrical shapes,
repeating patterns, and refrigerator art ;-). To demonstrate
what the action will do, see the figure below.
1.First, we'll need an image to practice
on: to use while we record and test our action. Either
download the sample file, MirrorTestPattern.psd
(or you may create your own pattern).
2. Assuming the Actions palette is already
visible, create a new set (
 ). Name the set "Mirror Corners". Add a new
action to the set (
). Name the set "Mirror Corners". Add a new
action to the set ( ). Name the action "Mirror Corners (v1.0)", and
assign a Function Key and Button Mode color if you like.
Finally, begin recording by pressing the Record button
(
). Name the action "Mirror Corners (v1.0)", and
assign a Function Key and Button Mode color if you like.
Finally, begin recording by pressing the Record button
(
 ). ).
3. Because we are going to duplicate the current layer (to preserve the user's original work), we
will hide the layer so that it does not obstruct the view of the final results. Click the Visibility icon
(
 ) associate
with the current layer. Notice that a command called "Hide current layer" has been added to
the action. ) associate
with the current layer. Notice that a command called "Hide current layer" has been added to
the action.
4. Next, duplicate the current layer by pressing Ctrl+J (Layer � New � Layer via Copy). Turn on
the new, duplicated layer by clicking on its Visibility icon. Both commands should appear in the
action.

5. In this step we will use the Edit � Transform command to flip a horizontal duplicate of our
current layer.
Note: Holding down the Alt key while choosing Edit � Transform performs a transform on a duplicate of
the original selection. Using this technique allows you to get two steps for the price of one!
Press Ctrl+Alt+T. In the Options palette, set the Reference Point location to the right side
(
 ); then
right-click in the document window and choose Flip Horizontal from the context menu. Press
Enter to accept the transformation. ); then
right-click in the document window and choose Flip Horizontal from the context menu. Press
Enter to accept the transformation.

6. Merge the two halves / layers together by pressing Ctrl+E (Layer � Merge Down).
7. Now let's flip the current layer vertically � similar to what we did in step 5. Press
Ctrl+Alt+T. In the Options palette, set the Reference Point location to the bottom
(
 );
then right-click in the document window and choose Flip Vertical. Press Enter to accept the
transformation. );
then right-click in the document window and choose Flip Vertical. Press Enter to accept the
transformation.
8. Again, merge the two halves together by pressing Ctrl+E.
9. To center the pattern we'll use the Layer � Align Linked To Selection commands.
Note: Unfortunately, you cannot use the Alignment buttons in the Options palette
because their functions will not get recorded.
Select the entire canvas by pressing Ctrl+A (Select � All). From the menus, choose Layer � Align To Selection
� Vertical Centers followed by Layer � Align To Selection � Horizontal Centers. Drop the selection by
pressing Ctrl+D (Select � Deselect).
10. Finally, stop recording by pressing the Stop button (
 ).
As a final touch, let's add a Stop message to let other users know what this action does. Choose
Insert Stop from the Actions palette menu ( ).
As a final touch, let's add a Stop message to let other users know what this action does. Choose
Insert Stop from the Actions palette menu (
 ). Enter
a brief description about what the action does and then check the Continue button. ). Enter
a brief description about what the action does and then check the Continue button.
Because we want the message to be displayed at the beginning of the action, drag the newly added Stop
command above the "Hide current layer" command (in the Actions palette) � so that it appears
as first step in the action.
Note: If you want the message to be present in the action, but not displayed each time
the action is played, simply uncheck the Include checkbox (
 ) for
the Stop. ) for
the Stop.

Now try your new action on different patterns and canvas sizes to make sure it works properly. Once you are happy
with the action, save it using the Save Actions command in the Actions palette menu.
Tips for Editing Actions
Here are a few tips that will make it easier to edit your actions:
- To begin playback from a specific step of an action,
simply choose the desired step and press the Play button
at the bottom of the Actions palette.
- Drag and drop steps to reorder them. This also works
for actions and sets.
- Alt-drag a step to duplicate it. This also works for
actions and sets.
- Double-click an action step to rerecord its associated
values. Alternatively, you may choose Record Again from
the Actions palette menu.
- Ctrl-click the button to play only the selected step.
This is useful for debugging an action.
- Select non-contiguous action steps using the Shift
key. Use the Ctrl key to range select contiguous action
steps. You may then delete, duplicate or even play the
selected steps! However, this only works within the
current action.
- Alt-click the Delete button (on the Actions palette)
to delete the selected item without confirmation. This is
equivalent to dragging the desired item onto the Delete
button.
- Even though operations performed in the Actions
palette may not be undone using the Edit � Undo command or
the History, you can undo / redo the last operation (and
only the last operation) by pressing Ctrl+Z.
- Hold both the Ctrl and Alt keys when choosing Save
Actions (from the Actions palette menu) to save all
actions as a text file. This is very useful for reviewing
or printing the contents of an action: however, the text
file cannot be reloaded into Photoshop.
- Alt-click on an action (not a step) triangle
(
 ) to expand / collapse all steps within the action.
- Alt-click on a set triangle (
) to expand / collapse all steps within the set.
- To include a path within an action, first create the
path (before recording the action); then, begin recording,
activate/select the path select and choose Insert Path
from the Actions palette menu.
Note: Set your ruler units to
percentage before using the Insert Path command to ensure
that the path is scaled and positioned relative to the
canvas size. Otherwise, the path may appear too large, or
completely outside the canvas boundaries.
- Create a snapshot (via the New Snapshot button in
the History palette) before running an action. That way,
if you do not like the results, you can revert the image
to its original state without having to undo every step
performed by the action.
Note: ImageReady treats
actions as single steps in its History palette so you
can undo actions in one step.
Tips and Guidelines for Creating Actions
Keep things generic
- Try to build your actions using commands that do not
use specific layer names (unless the layers are created
by the action itself). For example, instead of choosing
the previous or next layer by name, use the backward
layer and forward layer keyboard shortcuts: Alt+[ and
Alt+ ], respectively. (Add the Shift key to select the
bottom-most or top-most layer.)
- Use Percent as your units of measurement (where
applicable) to avoid situations where specific
transformations may be beyond the capabilities of
another canvas size.
- Perform all your operations within a single canvas
(i.e. the current canvas). Photoshop does not refer to
documents by name, but as "next" or "previous"
documents: this can cause problems if the number or
order of documents changes.
Reduce, reuse and recycle
- Optimize your action wherever possible. The fewer
steps, the faster the action will play and the easier it
will be to debug when / if something goes wrong. For
example, let's say you have an action with four steps
that duplicate a layer, name it, and then change its
blending mode and opacity. All of these operations
could, instead, have been accomplished in one step using
the Layer � New � Layer via Copy dialog box.
- If several steps need to be repeated, record them as
a separate action; then have the first action refer to
the second action as required (like an action
subroutine).
- Examine other people's actions to learn new (or
better) ways to accomplish certain techniques.
Consideration for other users
- Include instructions (by using Stops) that advise
the user what the action does and what is expected. If
your action requires additional plug-ins, give the name
and source of the plug-ins. You might also want to
include your name and email address in case the user has
problems or suggestions.
- Include a version number to distinguish different
(updated) copies of the action.
- Test your action in several different situations to
insure trouble-free operation.
- Preserve original layers whenever possible. If this
is not possible, at least have the action duplicate the
document as a first step.
Managing your actions
- Organize your actions by creating subfolders within
the default Photoshop Actions folder (C:\Program
Files\Adobe\Photoshop 6.0\Presets\Photoshop Actions\ �
assuming a default install on a PC). Photoshop will
still find these actions and even make them available
from the Action palette menu.
- Prefix actions subfolders (or even individual
actions) with a tilde (~) to disable them. Photoshop
will ignore any filenames beginning with a tilde.
- To apply an action (or a series of actions) to a
series of images, use the File � Automate � Batch
command.
- Use the File � Automate � Create Droplet command to
save an action as a droplet. A droplet is a small
executable file that will automatically launch Photoshop
and apply the designated action to any images that you
drop onto it.
For a great source of free actions, visit the
Adobe Action Xchange. As a member of the Action Xchange, you can even upload your actions for other users.
Membership is free.
I hope that you found this tutorial comprehensive and easy to follow (but most of all that you learned something
along the way ;-).
|